My greyhound can run faster than your honor student.

Sunday, June 29, 2008

We made our first batch of beer today and a batch of mead! The process was a lot of fun and I think I am going to like periodically spending an afternoon on the patio mixing up 5 gallons of beer.

The video below is just a couple minutes after we put the bag of specialty malt (crystal malt) into 2 gallons of water in the brew kettle. We kept it the water between 160 and 170 degrees for 20 minutes. I was surprised how quickly it colored the water and how dark it made the water.


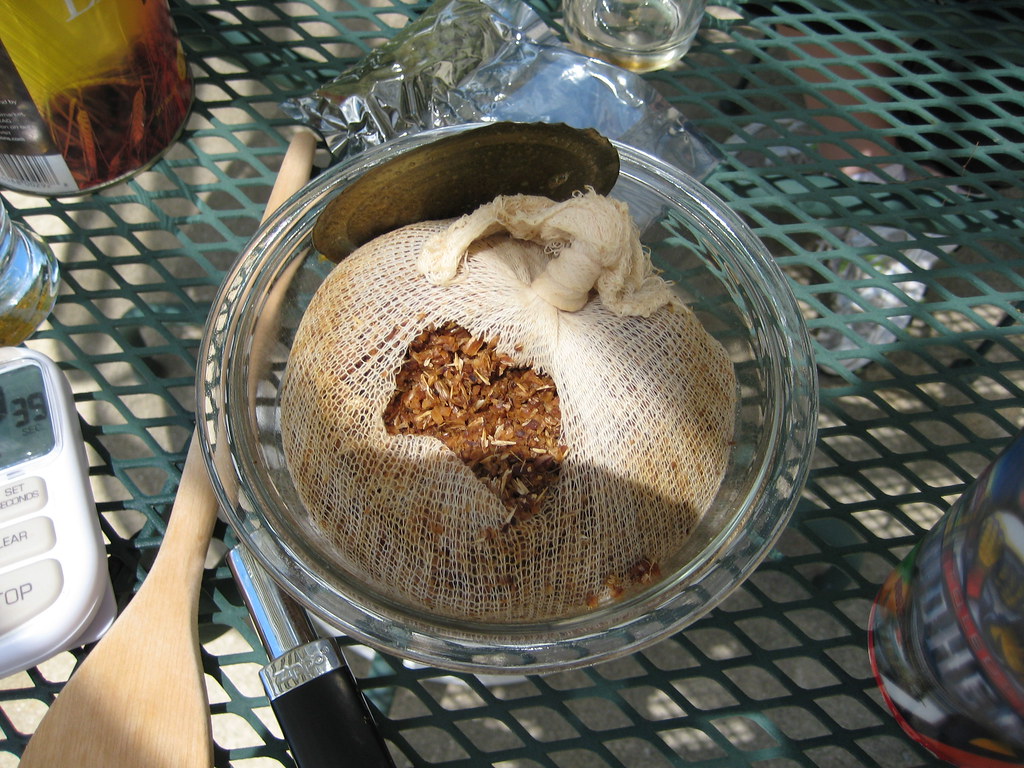
This is a picture of the muslin bag of grain after it was done steeping with a hole cut in it to see what it looks like. We tried a few bites of it and tt was like really fibrous oatmeal. Click on the picture to see a larger image.


After we removed the malt bag we turned off the burner and added two cans of liquid malt extract and the bittering hops. The heat gets turned off so the clumps of the syrupy malt extract that fall to the bottom do not burn. Once we completely stirred it into the liquid we turned the heat back on, brought it to a boil, and kept it boiling for 55 minutes. After 55 minutes we add the finishing hops and boiled for an additional 5 minutes.

We had a clean 7.9 gallon fermenter with 2 gallons of water that sat out overnight so the chlorine could evaporate off. We poured the wort (that is what is in the kettle now) into the fermenter, and then added additional water to bring the total volume to 5 gallons. The original gravity is 1.045. That is a measure of how much sugar is in the water. As it gets consumed by the yeast and turned to alcohol the specific gravity will drop. Subtracting the final gravity from the original gravity and plugging it into a formula will tell you how much alcohol is in the beer.

Once the wort had cooled to 105 degrees I added the yeast and put the lid on and inserted the air lock. Below is a video just a couple hours after I sealed it up and carried it to the basement. I apparently have some really happy yeast at work in there!


After about a week I will use a siphon to transfer the beer from the primary fermenter to a large glass jug called a carboy. This will clarify the beer because I will keep the tip of the siphon just a little bit above the sediment that will have settled to the bottom. I might do this once or twice more before I finally bottle it in two or three weeks. I will get a little clearer each time I do that.

Sunday, June 15, 2008

I have taken it upon myself to make it my life's work to get people to understand dew point rather than the more commonly used, but less useful to most, relative humidity. I have written before that all you need to know when listening to the weather report is that a dew point of 65 degrees or higher means high humidity and will be uncomfortable. The lower the dew point is, the dryer the air is. Today I am going to show you how useless it is for the average person to know what the relative humidity is.

The chart below charts out, from top to bottom, temperature, dew point and relative humidity. Relative humidity is a function of temperature, so notice that the temperature line (top) and relative humidity line (bottom) move in an almost perfect mirror pattern. But notice the dew point stays unchanged.


I grabbed this screen shot from the NOAA website a couple of years ago when we were going through a long hot and humid spell.

At night time (the lightly shaded area) the relative humidity shoots up to 89%, but during the day it drops to 43%. But it is not any less humid during the day, and it is just as uncomfortable as during the night. That is because relative humidity is not directly measuring how much actual moisture is in the air. It is telling you how much more moisture you can add to the air at a given temperature. Really useful to you, isn't it?

The dew point is a direct measure of how much moisture is in the air. It is not dependant on temperature and will not fluctuate when the temperature changes, only when the moisture content of the air changes.

Saturday, June 14, 2008

I went to the local homebrew shop today to check things out. They have a couple beginners equipment kits, but I think there are some things in there that I don't think I would use, so I worked up a list of the things I would want and priced it out. I asked if he would give me a discount because I was buying everything all at once and he said sure. The prices below are pre-discount. I think he might have put down the wrong prices for the pail and lid because those seem a little expensive. We also forgot to add a stopper for the carboy and fermentation air locks, but those are just a couple dollars each. I didn't buy anything today because Amy wanted to be there when we buy everything, so I will wait until she is back from California visiting her mom.


Glass carboy - 6.5 gallons29.50
fermenting pail – 6.5 gallons15.90
pail lid5.69
auto siphon10.20
bottling siphon9.90
hydrometer6.20
bottle sterilizer14.65
45-bottle drying tree29.00
capper16.95
Stainless steel brew kettle - 5 gallons32.50
Total 170.49


They had a bunch of ingredient kits too I looked over. I think my first one will be an American pale ale. I plan on doing a couple kits first before I try an all-grain batch. He gave me a sample of a double Belgian ale they made in the store and it was delicious. It was not from a kit, but it was not an all grain batch. It was a recipe they made using powdered malts and malt extracts. That might be a good intermediate to do between the kits and an all grain batch. I could be a little creative and pick the varieties of hops I want to use, maybe use some specialty malts, etc.

I went to Gordon's Food Service today and got 5 pounds of cocoa powder. Every morning I put a scoop in the soy protein drink I invented and it is cheaper to buy it this way rather than the 1 pound cans in the grocery store.

I went to performance bike after than and bought a chain cleaner, some chain cleaner fluid, and some Teflon chain lubricant.

Then I went to the homebrew shop as detailed above, and then because I was in the neighborhood I went to Farm and Fleet for no reason other than to walk around. I ended up getting hound food for Mitch, a rat trap, a solar powered LED dragonfly for the garden, and a Diet Coke, jerky and sesame sticks for the car because up to that point (3 PM) I only had coffee, a peanut butter and jelly sandwich and a beer sample and was a little beyond hungry.

After an afternoon of thinking about beer I really want to go have one, but I think I am going to cut the grass first and maybe take Mitch to the dog park or a walk around the neighborhood. If I had a beer now I probably wouldn't get to grass cutting next.

I also might have to take another video of me pouring a beer for my smartass brother in law, albeit probably not a homebrew one.

Friday, June 13, 2008

Five weeks ago we started our first batch of beer. A week ago we went back to the shop and bottled it. They said it would be ready after conditioning in the bottles for two weeks. Well I couldn't wait and tried one tonight after just one week. I was amazed at how much carbonation there was. I kind of expected it to be half flat.


I shot a video of me pouring it so you could see how much carbonation there was. In the video I say it has fermented four months. I meant four weeks. And it was delicious. I think I am going to the local homebrew shop tomorrow and buying my brewing gear.

Sunday, June 08, 2008

Yesterday afternoon we went back and bottled our beer. We had a taste of it directly from the fermenter, not chilled and not carbonated, and even like that it was fabulous! They drew off one bottle worth and charged just that bottle with their CO2 system and chilled it while we were bottling. When we tasted it that way it was even more amazing. Maybe one of the best beers I have had.

We started out by disinfecting our bottles. They had a little basin that held an iodine solution with a little push activated squirter in the center. You put the bottle on top of the squirter and push down three or four times. With each push it squirts the iodine solution into the bottle. They have a special rack that holds the bottles upside down so the excess solution and drain out. In the picture below you can see Amy using the disinfector. The red thing with all the bottles hanging off it is obviously the drip dry rack.


The picture below is 5 gallons of our beloved beer in a 6 or 6.5 gallon carboy. There is flexible plastic hose already inserted to use as a siphon for bottling. There is a stiff plastic tube attached to the hose with a little valve at the very bottom. You stick the tube all the way into the bottle. When the little valve hits the bottom of the bottle the beer starts flowing. Lift up the tube and the beer stops. Very clever! You fill it up right to the very top. When you pull the tube out of the bottle the level of beer falls and leaves the perfect amount of head space in the bottle. I think I like bottling that way better than opening and closing a spigot on a bottling bucket.


In the lower left corner of the picture you can see a little plastic bag with white stuff inside. That is priming sugar used. We took a couple cups of beer and microwaved it and then stirred the sugar in and then added it back to the carboy. Warming the beer just makes it easier to dissolve the sugar. This sugar will be totally consumed by the still-living yeast and converted to CO2 to carbonate the beer and will not add sweetness to it.

We took home 50 bottles. We would have had 52 but we drank one there and broke one while bottling. Right now they are sitting in my basement at about 69 degrees and should be ready to drink in about two weeks.

From what I've read online as the beer ages after the two week period the bubbles will get finer and finer and the flavors will improve and mesh even more. They recommended, especially for beginners. To have one beer a week and pay attention to how it changes over time.

The beer was so good, and it is kind of fun and cool to do, I think I am going to buy some gear and try making some myself.